Why do you need to do this
On older caravans the window rubbers are prone to deterioration and in order to prevent the risk of water ingress from the window it is advisable to replace them. Our guide shows you how
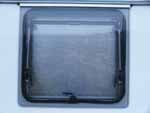
How the window seals work
The basic construction starting from the outside is the main window with its window locks and edging strip fitted, this edging strip has a beaded edge along it which fits into a groove in a strip which is then screwed onto the caravan, seated with a suitable sealant.
Then we have the caravan side of it, starting with the parts fitted to the caravan, we have the main rubber seal, which is made to fit the caravans walls, each caravan is different here, some have a thicker section than others, and the rubber seal fits around this, with two lips. The rubber seal is actually sealed onto the window aperture, with a suitable mastic sealant, and then stapled into place. On top of this there is a plastic strip that fits into two small rubber lips in the top of the rubber seal, this is a facing that covers all the staples but is necessary also for appearance. On top of this, all the plastic fitting for the window handles are screwed including the two window adjusters/stays.
Stage one - work out how you are going to do the job
There are two ways of replacing the window seals
1. re-do the seal only without removing the window - and to do this, the window will need to be propped open, to keep it up out of the way;
2. the other way, is to remove the window, and do the
seal at the hinge strip too, which will let you examine
the condition of the sealant at the hinge strip; if
you took it off and found the sealant deficient, you’ll
be glad you did.
 But
lets look at the receiving end of the window just now
and we can deal with the removal of the actual window
and its hinge later.
But
lets look at the receiving end of the window just now
and we can deal with the removal of the actual window
and its hinge later.
Stage 2 - Removing the window and seal
The first job to do is to open the window. Then on the inside of the caravan with a pencil and mark either end of each of the plastic window fittings, so that they can be put back in the right places.
Make a careful note of how this small hinge for the window stay is fitted, which way up etc, take a screwdriver and undo the two window props on the caravan so that they hang loose.
Prop the window up out of the way, you can use a suitable piece of wood but be careful not to open it too far, beyond its limits, (some caravans have a window rail that runs the full length of the caravan, in which case you can loosen the small screw in the plastic clip in the window hinge and slide it along, then slide the window along behind it.
Noting the way the fittings go, remove them and keep them safe along with their screws. Go to the top end of the seal and find the join in the top of the white plastic now pull it out until the other end is seen, then mark it. (Do not mark it on the rubber seal – mark it on the interior of the caravan wall, just a small mark is necessary, also put a small mark or take a note of what way up the seal goes).
Pull out the trim all the way around, and keep it in a safe place. You may be horrified at what you see when you remove the trim; when I opened mine up I found that ALL the staples at the lower part of the window had rusted away, this may not necessarily be that the caravan has rusted them all – remember that you caravan windows can get steamed up at night or in wet weather, this is all it takes, through time.
Stage 3 - check the sealant
Go around the lip of the seal that is in contact with the body of the caravan, and pull it back a little if possible, if no sealant sticks to your fingers then you need to replace the sealant, using a screw driver, go around the staples and lever them up a bit, you will find that some will break and some will be non-existent, just lever up what you can. Go around with a pair of pointed pliers and pull them out, don’t worry about the stubs that you can’t get. Go to the middle, bottom of the window seal and find the join, pull one end up, and have a look at how it fits, and then carefully peel it back all the way around, put it somewhere safe. Get the ordinary pliers and go around the window opening pulling out all the stubs of the staples that couldn’t be removed earlier.
Check the timber and re-seal
How does the timber in the frame look? Is it dry and sound? If so, good!
Go around the window opening with a chisel or a wide flat bladed screwdriver and scrape away all of the sealant that is left, it will probably look like putty but not sticky, be careful when removing it from the outside metal panelling of the caravan; just remove the most that you can, then use petrol or white spirit to clean the rest.
Open the tube of Sikaflex and load it into the gun, and go around all the holes in the wood filling them with the glue, if you find the metal coming away from the wood in the frame, use a little Sikaflex to glue it back too.
The rubber window seal now needs to be cleaned and examined, just scrape off the excess sealant, then go around looking at the general condition of the rubber, check for splits and perished areas – Watch out for staples still stuck in the rubber. Clean the white plastic strip too; the rust from the staples can be cleaned out using a wire brush.
The tools you need
Replacing the window mastic is not easy, and it is time consuming, there are a lot of things to remember and a dry sheltered area is required, it is not the sort of job you can just do out side on a whim, even if the weather is excellent at the time.
The tools needed are as follows:
-
A good selection of screwdrivers
-
A good pair of pliers
-
A good quality staple gun with 10 – 14mm staples
-
A small hammer
-
A selection of chisels (they don’t have to be sharp)
-
A pair of vice grips (you’ll find out why, later)
-
Some petrol and some good but, old cloths
-
A sealant gun
-
A small tub to put small parts into
-
A bin
-
A tube of IDL99 sealant
-
A tube of Sikaflex adhesive/sealant
-
A drill/driver and screwdriver bits
-
A set of HSS drill bits
-
A few pairs of rubber/latex gloves, and some old clothes, and
-
A Stanley scraper with its plastic blade.
Take a look at the tool
section of our shop to buy these products at trade
prices